A cracked or shattered side view mirror glass isn’t just an eyesore—it’s a safety risk. Replacing it promptly ensures better visibility, prevents further damage, and keeps your vehicle road-safe and compliant. Thankfully, replacing your auto side view mirror glass is a simple DIY task that can save time and money. In this professional guide, we walk you through every step using practical tools and expert tips.
Why Replacing Side Mirror Glass Matters
Side mirrors play a crucial role in driving safety by providing visibility of surrounding traffic. Damaged mirrors can:
- Distort your view of adjacent lanes
- Increase blind spots
- Lead to traffic violations
- Lower your vehicle’s resale value
Replacing only the mirror glass (rather than the entire assembly) is a smart, cost-effective solution—especially when the housing and motor are intact.
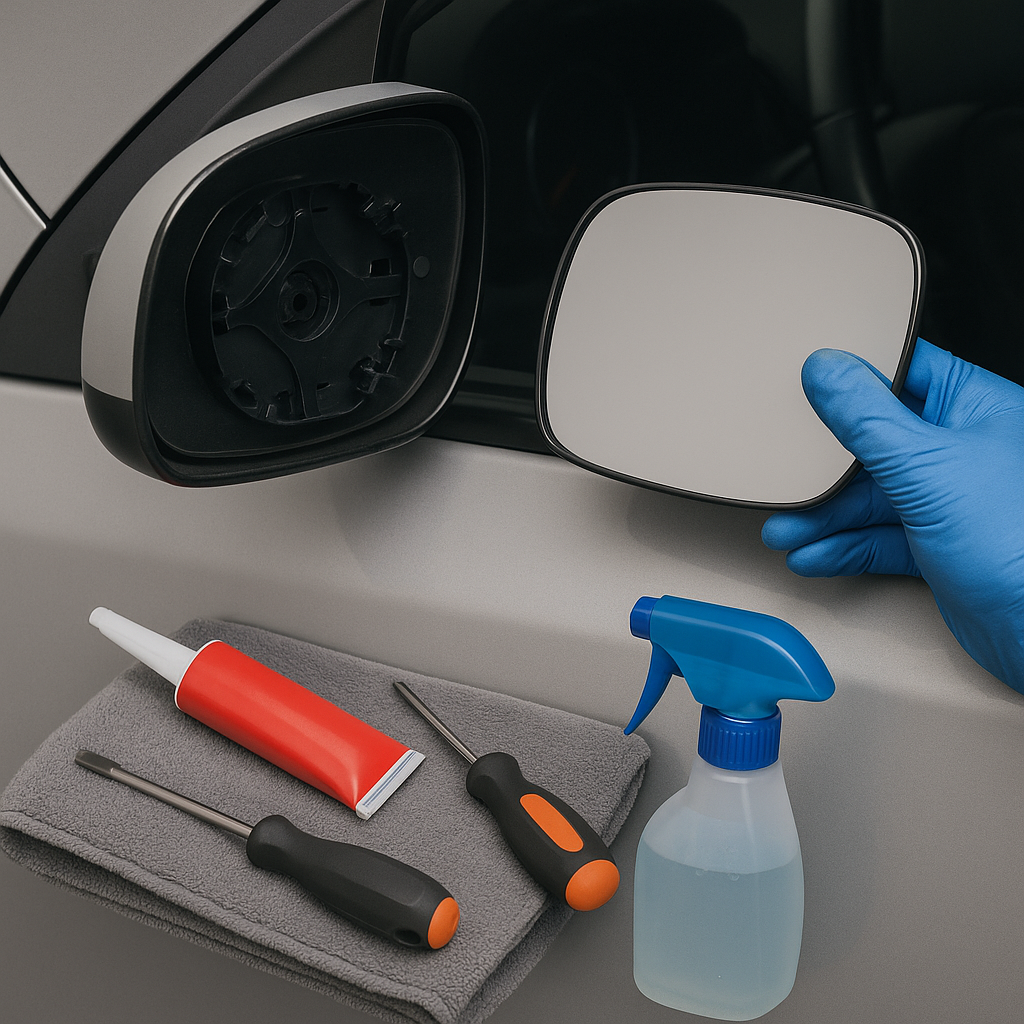
Tools and Materials You’ll Need
Before you begin, gather the following:
- Replacement side mirror glass (OEM or aftermarket)
- Glass adhesive or double-sided mirror tape
- A flathead screwdriver or trim removal tool
- Gloves (for safety)
- Microfiber cloth and glass cleaner
- Heat gun or hairdryer (if the mirror is heated)
🔧 Pro Tip: Make sure to order mirror glass that matches your vehicle’s make, model, and year.
Step-by-Step Guide to Replacing Side Mirror Glass
Step 1: Inspect the Damage
Determine whether the mirror is:
- Cracked but intact
- Completely shattered
- Detached from the backing plate
If the housing and adjustment motor are undamaged, replacing the glass is all you need.
Step 2: Remove the Damaged Glass
Wearing gloves, gently pry out the old mirror glass:
- Use a flathead screwdriver to lift the edges.
- Carefully detach any clips or adhesive holding it in place.
- If the mirror is shattered, remove fragments one by one.
⚠️ Safety Note: Use a masking tape crisscross over cracked glass to minimize shards during removal.
Step 3: Clean the Backing Plate
Once the old glass is removed:
- Clean off any remaining adhesive with a scraper or rubbing alcohol.
- Wipe down the backing plate with a microfiber cloth.
- Ensure a flat, dry surface for new glass adhesion.
Step 4: Attach the New Mirror Glass
Depending on your product, you’ll either snap in the mirror or adhere it using tape or glue.
Option 1: Snap-On Glass (with backing plate)
- Align the clips of the new mirror with the housing.
- Press firmly until you hear it click into place.
Option 2: Stick-On Glass (adhesive or tape)
- Apply double-sided automotive tape or glue to the back of the mirror.
- Align it carefully and press it against the backing plate.
- Hold for 30–60 seconds to ensure a strong bond.
💡 Heated Mirror Tip: If the mirror is heated, reconnect the wiring harness before snapping in the glass.
Step 5: Test the Mirror Function
Turn on your car and:
- Adjust the mirror using the switch to ensure proper movement.
- Check heating functionality (if applicable).
- Inspect alignment for clear rear and side visibility.
When to Replace the Entire Side Mirror Assembly
Replace the full mirror assembly (not just the glass) if:
- The housing is cracked or broken
- The internal motor doesn’t work
- The mirror won’t adjust properly
- The turn signal (if integrated) is damaged
Benefits of DIY Side Mirror Glass Replacement
- Affordable: Save on labor and parts costs
- Quick: Most replacements take less than 30 minutes
- Satisfying: Gain practical car maintenance skills
- Safe: Restore clear visibility and driving safety
Where to Buy Quality Replacement Side Mirror Glass
For best results, buy:
- OEM (Original Equipment Manufacturer) mirror glass
- High-quality aftermarket replacements with warranty
- Heated mirror glass (if originally equipped)
You can find these at auto parts stores, dealerships, or reputable online retailers.
Final Thoughts
Replacing your side view mirror glass is a simple and essential maintenance task. With the right tools and a bit of patience, you can restore both the functionality and look of your car’s mirrors in no time. Whether you’re preparing for a road trip or just want your car to look its best, this repair is one you can confidently tackle on your own.